9 min to read
[Ansible for Kubespray] 5. Handlers and Notifications
Cloudnet@ K8S Deploy — Week2
Introduction
지난 글에서는 loop와 when을 사용하여 반복 작업과 조건부 실행을 제어하는 방법을 배웠습니다.
하지만 운영 환경에서는 단순히 설치하고 끝나는 것이 아니라 설정 파일이 변경되면 서비스를 재시작해야 하고, 작업 중에 예상치 못한 에러가 발생하면 이를 우회하거나 복구해야 합니다.
이번 글에서는 위와 같은 상황을 대처하기 위해 Handlers등에 대해 알아보고자 합니다.
Handlers
Ansible의 핵심 철학 중 하나는 멱등성(Idempotency)입니다. 즉, Playbook을 여러 번 실행해도 결과가 동일해야 하며, 불필요한 변경을 일으키지 않아야 합니다.
하지만 설정 파일(ansible.cfg 등)을 수정했다면, 변경 사항을 적용하기 위해 반드시 서비스를 재시작해야 합니다. 매번 재시작하는 것은 비효율적이고 서비스 중단을 야기할 수 있습니다. 이때 사용하는 것이 Handler입니다.
Example
Handler는 Task와 동일한 문법 구조를 가집니다만, notify에 의해 호출되었을 때만 실행된다는 점에서 큰 차이가 있습니다. 또한, 모든 Task 완료 후 한 번만 실행됩니다.
---
- name: Handler Example
  hosts: tnode2
  tasks:
      - name: Ensure rsyslog is installed
        ansible.builtin.apt:
            name: rsyslog
            state: present

      - name: Restart rsyslog
        ansible.builtin.command: /bin/true
        notify: Restart rsyslog

  handlers:
      - name: Restart rsyslog
        ansible.builtin.service:
            name: rsyslog
            state: restarted
위 예제에서 notify: Restart rsyslog Task가 Changed 상태가 되면, Ansible은
Handler 목록에서 이름이 일치하는 Handler를 찾아 실행 예약 목록에 넣습니다.
Multiple Notifications
notify는 리스트 형태를 지원하기 때문에 아래와 같이 하나의 Task가 여러 Handler를 호출할 수 있습니다.
---
- name: Multiple Handlers Example
  hosts: localhost
  tasks:
      - name: Change configuration file
        ansible.builtin.copy:
            content: "new_config_value=true"
            dest: /tmp/app.conf
        notify:
            - Restart Service
            - Audit Log

  handlers:
      - name: Restart Service
        ansible.builtin.debug:
            msg: "Service is restarting..."

      - name: Audit Log
        ansible.builtin.debug:
            msg: "Configuration change detected!"
반대로 여러 Task가 하나의 Handler를 호출할 수도 있습니다. 이때 중요한 점은 Handler가 여러 번 호출되더라도 Play의 마지막에 딱 한 번만 실행된다는 것입니다. 이를 통해 불필요한 중복 실행을 방지할 수 있습니다.
---
- name: Handler deduplication example
  hosts: localhost
  tasks:
      - name: Update config file
        ansible.builtin.copy:
            content: "port=8080"
            dest: /tmp/app.conf
        notify: Restart Service

      - name: Update ssl config
        ansible.builtin.copy:
            content: "ssl=on"
            dest: /tmp/ssl.conf
        notify: Restart Service

  handlers:
      - name: Restart Service
        ansible.builtin.debug:
            msg: "Service restarted!"
위의 코드는 아래와 같은 실행 순서를 가집니다.
- Task 1 실행 →
notify: Restart Service(1번째 호출) - Task 2 실행 →
notify: Restart Service(2번째 호출) - 모든 Task 완료 후 →
Restart ServiceHandler 1회만 실행
Error Handling
Ansible은 기본적으로 Task가 실패하면 즉시 실행을 중단합니다. 하지만 운영 환경에서는 특정 에러를 무시하고 진행하거나, 실패 시에도 반드시 후속 조치를 취해야 하는 경우가 빈번합니다. 이러한 예외 상황을 유연하게 제어하는 방법을 알아봅니다.
Ignoring Errors
특정 Task가 실패하더라도 멈추지 않고 계속 진행해야 한다면 ignore_errors: true를 사용합니다.
---
- name: Ignore Errors Example
  hosts: localhost
  tasks:
      - name: This task will fail but continue
        ansible.builtin.command: /bin/false
        ignore_errors: true

      - name: Next task
        ansible.builtin.debug:
            msg: "I am still running!"
/bin/false 명령어를 통해 Exit Code를 1로 설정하였기 때문에 Ansible은 이 Task를 실패로 간주합니다. 하지만 ignore_errors 설정에 따라 Task가 실패하더라도 다음 Task가 실행되었습니다.
 ignored
Force Handlers
보통 Task가 실패해서 Play가 중단되면, 그전에 notify 되었던 Handler들도 실행되지 않습니다. 이는 시스템을 불안정한 상태로 남길 수 있습니다.
force_handlers: true를 설정하면, 중간에 에러가 발생하더라도 notify 받은 Handler는 반드시 실행합니다.
---
- name: Force Handlers Example
  hosts: localhost
  force_handlers: true
  tasks:
      - name: Important config change
        ansible.builtin.command: /bin/true
        notify: Restart Service
        changed_when: true

      - name: Task that fails
        ansible.builtin.command: /bin/false

  handlers:
      - name: Restart Service
        ansible.builtin.debug:
            msg: "Service is restarting despite the failure!"
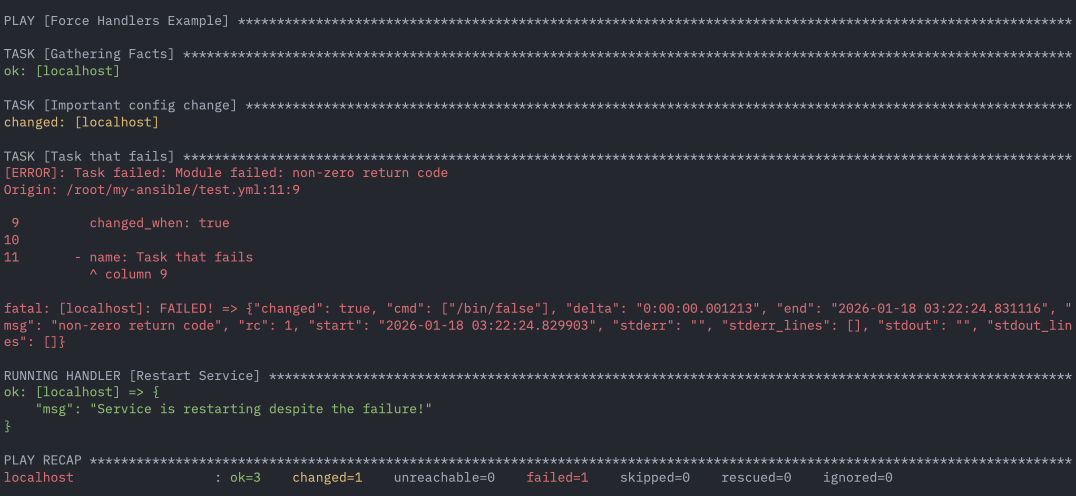 force_handlers
Failed When (Custom Failure Conditions)
shell이나 command 모듈은 명령어가 실행만 되면 changed상태를 반환하며, 성공으로 간주(rc=0)합니다. 이는 Script 내부에서 에러가 나더라도 Ansible은 이를 감지하지 못하고 성공한 것으로 오인합니다.
이때 failed_when을 사용하여 실패 조건을 직접 정의할 수 있습니다.
---
- name: failed_when example
  hosts: localhost
  tasks:
      - name: Check service status
        ansible.builtin.shell: systemctl is-active nginx
        register: service_status
        failed_when: service_status.rc != 0
먼저 nginx가 실행중인지를 service_status로 확인합니다.
- nginx가 실행중이면
active로 출력(service_status.rc == 0) - nginx가 실행중이지 않으면
inactive로 출력(service_status.rc != 0)
failed_when: service_status.rc != 0에 따라 실행중이지 않으면 실패한 것으로 간주합니다.
Blocks (Try-Rescue-Always)
프로그래밍 언어의 try-catch-finally 구문처럼, Ansible에서도 작업을 논리적으로 묶어서 에러를 처리할 수 있습니다. 이를 Block이라고 합니다.
- block: 실행할 기본 작업들 (Try)
- rescue: block 작업이 실패했을 때 실행할 복구 작업들 (Catch)
- always: 성공/실패 여부와 상관없이 무조건 실행할 작업들 (Finally)
Example
find 모듈로 디렉터리 존재 여부를 확인하고, 없으면 rescue에서 디렉터리를 생성한 뒤, 마지막에 always에서 로그 파일을 생성하는 흐름을 확인해 봅니다.
---
- name: Block Example
  hosts: tnode2
  vars:
      logdir: /var/log/daily_log
      logfile: todays.log

  tasks:
      - name: Configure Log Env
        block:
            - name: Find Directory
              ansible.builtin.find:
                  paths: "{{ logdir }}"
              register: result
              failed_when: "'Not all paths' in result.msg"

        rescue:
            - name: Make Directory when Directory Not Found
              ansible.builtin.file:
                  path: "{{ logdir }}"
                  state: directory
                  mode: "0755"

        always:
            - name: Create File
              ansible.builtin.file:
                  path: "{{ logdir }}/{{ logfile }}"
                  state: touch
                  mode: "0644"
- block:
find로logdir디렉터리를 확인합니다. 디렉터리가 없으면failed_when에 의해 실패로 처리됩니다. - rescue: block이 실패한 경우에만 실행되며,
logdir을 생성해서 복구합니다. - always: 성공/실패와 무관하게 항상 실행되며,
logdir/logfile파일을touch로 생성합니다.
따라서 첫 번째 실행에서는 디렉터리가 없어 block이 실패하고 rescue가 동작해 디렉터리를 생성한 뒤 always가 파일을 생성합니다. 반면 두 번째 실행에서는 디렉터리가 이미 존재하므로 block이 성공하여 rescue는 건너뛰고, always만 실행되어 파일을 생성합니다.
Challenges
이번 실습에서는 2가지 도전 과제를 통해 Handler의 활용법을 익힙니다.
- Apache 패키지 설치 및 핸들러를 이용한 재시작
- Block, Rescue, Always를 활용한 오류 제어
Mission 1
apt 모듈을 사용하여 apache2 패키지를 설치합니다. 패키지가 새로 설치되거나 업데이트되어 상태가 변경(changed)되었을 때만 notify를 사용하여 apache2 서비스를 재시작하는 핸들러를 호출합니다.
---
- name: Apache Installation with Handler
  hosts: tnode2
  tasks:
      - name: Install Apache2
        ansible.builtin.apt:
            name: apache2
            state: present
        notify: Restart Apache2

  handlers:
      - name: Restart Apache2
        ansible.builtin.service:
            name: apache2
            state: restarted
Mission 2
공식 문서의 Blocks 예제를 기반으로, 의도적으로 block에서 실패를 발생시켜 rescue로 복구하고 always가 동작하는 흐름을 확인합니다.
---
- name: Block Rescue Always Example
  hosts: localhost
  tasks:
      - name: Attempt and recover demo
        block:
            - name: Print a message (runs normally)
              ansible.builtin.debug:
                  msg: "I execute normally"

            - name: Force a failure
              ansible.builtin.command: /bin/false

            - name: Never runs
              ansible.builtin.debug:
                  msg: "I never execute, due to the above task failing"

        rescue:
            - name: Recovery step
              ansible.builtin.debug:
                  msg: "I caught an error and can recover here"

        always:
            - name: Always run cleanup/finalize
              ansible.builtin.debug:
                  msg: "This always executes"
Blocks에서
rescue/always동작, 그리고 실패 상황에서도 Handler를 강제로 실행시키는meta: flush_handlers와 같은 패턴은 공식 문서에 정리되어 있습니다.
Comments